How much bleed does a print job actually need?
3mm past the trim on every side, or 0.125in if the job is specced in inches. Go to 5mm when the stock is thick or the book is thick. Large format is a different animal and the allowance comes out of the finishing rather than the printing: enough to disappear into the hem, the pole pocket or the frame wrap, which can mean 25mm or more.
None of that is a standard. No ISO document specifies a bleed amount. PDF’s own specification (ISO 32000) defines a BleedBox, and PDF/X (ISO 15930) requires a TrimBox or ArtBox, but neither of them says how much bleed you have to leave. When a customer tells you the standard is 3mm, what they mean is that the convention is 3mm, and there’s no guarantee the next shop agrees.
What the bleed is actually covering
The image on the sheet and the position of the cut are two independent systems. Most misregistration is close to a pure translation: the trim rectangle is the right shape, in slightly the wrong place.
Say the cut window lands 0.6mm to the right of where it should. Both cuts move right with it. The left-hand cut falls 0.6mm inside the artwork, so you lose 0.6mm of picture and nobody ever knows. The right-hand cut falls 0.6mm outside it, and that’s where the paper shows.
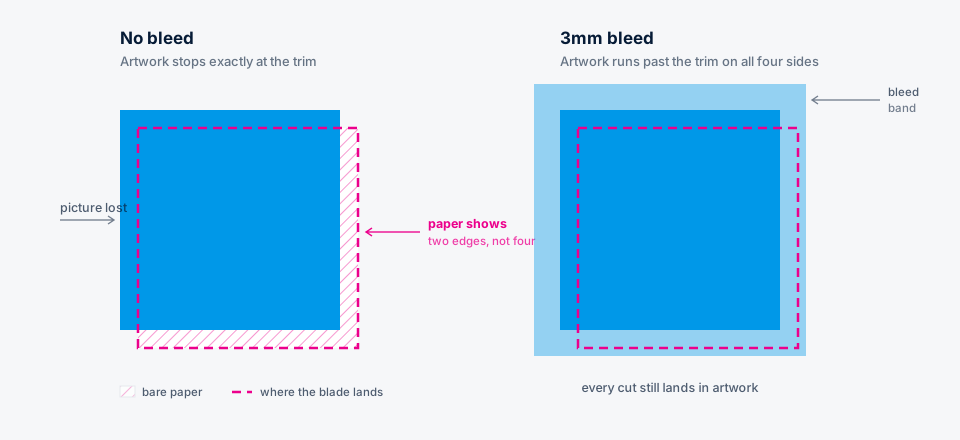
A missing bleed usually shows up as a white hairline down one side. One edge per axis, two at most. If you’re getting a white line on all four sides, something else has gone wrong: the artwork was placed too small, or scaled to fit and centred.
Blade drift is only one of the causes. There’s tolerance in folding and binding; creep, where paper thickness pushes the inner pages of a section outward; and paper moving with humidity between printing and trimming. All of that together is why 3mm looks generous next to a single guillotine’s accuracy, and why thick books want more.
The numbers, and where the trade disagrees
0.125in is 3.175mm, so the imperial convention runs 0.175mm bigger per side than the metric one. That gap sits far below anything a guillotine can resolve, so converting for the press achieves nothing. An automated preflight that hard-checks 0.125in will still bounce a 3mm file for being 0.175mm short on every side, so build the file in the unit the spec was written in.
Underneath the convention, metric bleed genuinely runs anywhere from 2mm to 5mm depending on the shop, and it’s not unusual to find a printer applying 1/16in (1.5875mm) internally on digital work while still asking customers for 1/8in.
The arithmetic for the sizes that come through most often, with pixel counts for the whole bled sheet at 300 dpi.
| Trim | Sheet at 3mm bleed | Sheet at 5mm bleed | Pixels, 3mm bleed at 300 dpi |
|---|---|---|---|
| A6 105 × 148mm | 111 × 154mm | 115 × 158mm | 1311 × 1819 |
| A5 148 × 210mm | 154 × 216mm | 158 × 220mm | 1819 × 2551 |
| A4 210 × 297mm | 216 × 303mm | 220 × 307mm | 2551 × 3579 |
| A3 297 × 420mm | 303 × 426mm | 307 × 430mm | 3579 × 5031 |
| DL 99 × 210mm | 105 × 216mm | 109 × 220mm | 1240 × 2551 |
| Card (AU/NZ) 90 × 55mm | 96 × 61mm | 100 × 65mm | 1134 × 720 |
| Card (EU) 85 × 55mm | 91 × 61mm | 95 × 65mm | 1075 × 720 |
A US business card at 3.5 × 2in plus 0.125in is 3.75 × 2.25in, or 1125 × 675 pixels. If a supplied file falls short of those pixel counts it has a resolution problem before it has a bleed problem, and what a file needs and how to check it covers that check.
Safe areas vary much more than bleed does
Bleed conventions only vary a little. Safe areas vary by a factor of four: some trade printers ask for 3mm, others ask 5mm and want 6mm to 8mm on the spine side of bound work. US shops commonly publish 0.125in, some 0.25in, and print-on-demand book platforms ask for as much as 0.5in on interiors. Every one of those is a published spec from a reputable printer.
As a working rule, treat 3mm as the floor and 5mm as comfortable, and give book interiors and large format considerably more.
Watch for the per-side versus total distinction. Some specs quote a figure as a total across the sheet rather than per edge, which is how a number quietly doubles on its way into a template.
A 3mm bleed plus a 5mm safe area gives you an 8mm band spanning the trim in which nothing is certain. On A4 a 5mm inset leaves 200 × 287mm live. On a 90 × 55mm card the same 5mm inset leaves 80 × 45mm, which is a quarter of the card gone before anything has been set.
Bound work bleeds on three edges
Nothing gets cut at the gutter, because it’s bound in, so it takes no bleed. A 6 × 9in book interior with bleed is commonly supplied at 6.125 × 9.25in: width grows by 0.125in on the outside edge only, height by 0.25in for head and foot. Supply 6.25 × 9.25in and it fails preflight.
Adding bleed also changes the margin figure some platforms quote, often 0.25in without bleed against 0.375in with it. The rule hasn’t got any tighter. The with-bleed figure is measured from the edge of the oversized page, which sits outside the trim, so the live area barely moves. Gutters grow with page count too, because a thicker book needs more of the inside edge.
Not every vendor uses the three-edge rule. Some ask for a four-side interior flow, so the same 6 × 9in book supplies at 6.25 × 9.25in. You have to check per vendor and per product.
Two jobs change the reasoning behind the number. On folding cartons, the bleed has to cross internal fold lines into the adjacent panel so no white shows at the fold once the box is erected. On large format the material gets eaten by hemming, pole pockets and frame wrap instead of by a blade, and that’s why those figures jump so far.
Real bleed and mirrored bleed
Real bleed means the designer drew the artwork past the trim. Synthetic bleed means someone reconstructed the band from artwork that stopped at it. Mirroring is the usual method and there’s nothing disreputable about it. RIPs ship mirroring and pixel-repetition fixups as standard, working from the TrimBox and rewriting the BleedBox to match.
Print Prepper’s bleed is a mirror. It reflects the artwork outward past the trim with a libvips mirror extend, shaving two pixels off each edge first and rebuilding them from mirrored interior content, so a faint light row inherited from rasterisation doesn’t get doubled into a hairline across the printed edge. Its bleed field takes whole millimetres, so an imperial spec has to be agreed in metric first. What it does is reconstruct a bleed for a file that never had one, working only from what the designer already drew.
The mirrored band gets imaged on the sheet every time, which is the point of putting it there. Land the cut true and none of it survives the trim. It only becomes visible when the cut misses, which is the case it exists to cover in the first place.
It holds up on solid colour, flat grounds, noise and grain, soft photo edges, and gradients running parallel to the trim. It gives itself away on hard linear features crossing the trim at an angle, on regular repeating patterns, on gradients running perpendicular to the trim and, worst of all, on type or a logo near the edge, where it produces a reversed ghost of the lettering.
It won’t rescue artwork with a thin border, which the mirror just doubles into a stripe, and it can’t do anything for artwork that stops short of the trim, since mirroring a white margin only gives you more white.
Checking a supplied file
Measure the sheet before you read the boxes. A4 with 3mm bleed is 216 × 303mm, so a page measuring exactly 210 × 297mm has no bleed, whatever the BleedBox claims. Then check that the artwork actually reaches the sheet edge. Correct geometry with white sitting in the band is worse than no bleed at all, because it passes inspection. On bound work, count the edges. And settle the safe area with whoever is finishing the job before the type is set.