Print resolution: what a file needs and how to check it
Divide the pixel dimensions by the finished size in inches. That number is the resolution the job prints at, and nothing in the file header changes it.
- inches = millimetres ÷ 25.4
- effective ppi = pixels ÷ inches at final size
- pixels needed = inches × target ppi
Worked:
- 1800 px placed 6 in wide: 1800 ÷ 6 = 300 ppi. Fine.
- The same file placed 12 in wide: 1800 ÷ 12 = 150 ppi. Same file, half the resolution.
- 2400 px across A4 portrait: 210 ÷ 25.4 = 8.2677 in, so 2400 ÷ 8.2677 = 290 ppi. Fine.
- The same 2400 px across A4 landscape: 297 ÷ 25.4 = 11.6929 in, so 2400 ÷ 11.6929 = 205 ppi. Marginal.
The rest of the argument is only about what target ppi you put on the right-hand side.
The ten-second check
If the customer sent a layout, open the Links panel and read the Effective PPI column. Actual PPI is the placed file’s own resolution at 100 per cent. Effective PPI is what it became after the designer scaled it, and that’s the figure you want. In InDesign the column is off by default, so turn it on in Panel Options once. InDesign reports neither figure for Photoshop EPS files, so a blank cell is not a pass.
If the customer sent a loose image, ignore the ppi tag and read the pixel dimensions, then divide by the finished size in inches. The tag is metadata: the same photograph tagged 300, 72 and 10 ppi and placed at the same physical size prints identically.
So asking a customer for “300 dpi” gets you nowhere. Ask for pixel dimensions at finished size.
Pixel dimensions at 300 dpi
| Trim | Size | Pixels at trim | Pixels with bleed |
|---|---|---|---|
| A6 | 105 × 148 mm | 1240 × 1748 | 1311 × 1819 |
| A5 | 148 × 210 mm | 1748 × 2480 | 1819 × 2551 |
| A4 | 210 × 297 mm | 2480 × 3508 | 2551 × 3579 |
| A3 | 297 × 420 mm | 3508 × 4961 | 3579 × 5031 |
| A2 | 420 × 594 mm | 4961 × 7016 | 5031 × 7087 |
| A1 | 594 × 841 mm | 7016 × 9933 | 7087 × 10004 |
| DL flyer | 99 × 210 mm | 1169 × 2480 | 1240 × 2551 |
| Business card (AU/NZ) | 90 × 55 mm | 1063 × 650 | 1134 × 720 |
| Business card (EU) | 85 × 55 mm | 1004 × 650 | 1075 × 720 |
| Business card (US) | 3.5 × 2 in | 1050 × 600 | 1125 × 675 |
| US Letter | 8.5 × 11 in | 2550 × 3300 | 2625 × 3375 |
| Tabloid | 11 × 17 in | 3300 × 5100 | 3375 × 5175 |
| Postcard | 4 × 6 in | 1200 × 1800 | 1275 × 1875 |
Bleed here is the usual 3 mm per edge on the metric sizes and 0.125 in on the imperial ones. See how much bleed a print job needs for when it is not enough.
The Australian and New Zealand business card is 90 × 55 mm, and the common European one is 85 × 55 mm. Five millimetres shows at that size, and it’s a standing source of cards that arrive the wrong shape.
Where 300 came from
Three unrelated things land near 300, and that’s why it stuck.
The first is screening. The quality-factor rule says image ppi = QF × screen ruling in lpi, with QF between 1.41 and 2. ISO 12647-2 puts the ruling for four-colour work in the range 48–80 cm⁻¹, with preferred nominal frequencies of 120–200 lpi on coated and 120–175 lpi on uncoated. At 150 lpi, 2× is exactly 300.
Now take 175 lpi, a common coated sheetfed ruling. The 2× rule wants 350 ppi there, so 300 sits below the classical requirement. At 200 lpi it is only 1.5×. Nobody reprints over that, so 2× was always a conservative number.
The trade has never agreed on the factor. Some argue 1.5× is plenty (225 ppi at 150 lpi). Others hold the line at 2×. The 1.41× figure comes from the diagonal of the halftone cell under rotation. All three are defended by people who know what they’re doing, and the disagreement is still live. Content decides it: continuous-tone photographs sit at the bottom of the range, while combination images with sharp type or line work in the raster want the top.
Where less is genuinely fine
Requirements fall off with viewing distance, and they fall off fast.
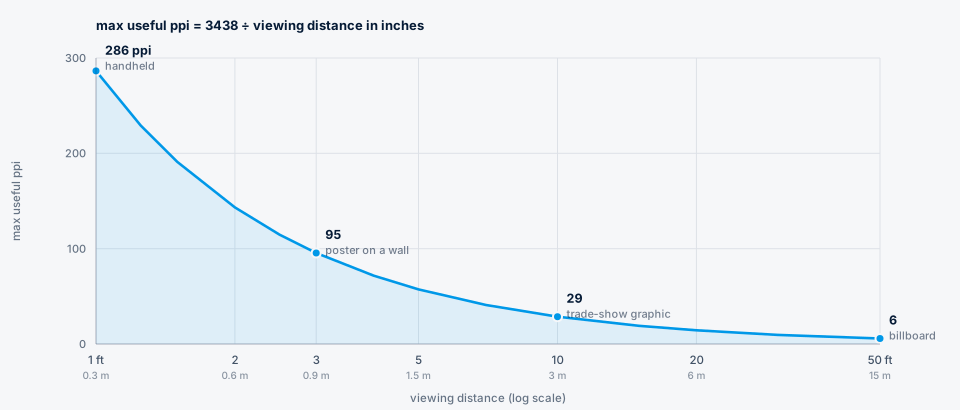
One arcminute of visual acuity is the usual limit. At a viewing distance measured in inches, the ceiling is about 3438 ÷ distance ppi. At a 12 in reading distance that’s 286 ppi, which is the second reason 300 stuck. At 3 ft it is 95, at 5 ft 57, at 10 ft 29, and at 50 ft about 6.
The third reason is that 300 is a round number.
Large-format guidance from the equipment makers commonly sets a floor near 100 dpi and says outright that 300 belongs to smaller work. Tiered tables circulate attributed to particular manufacturers without appearing in their documentation, so treat those as trade practice.
A 24 × 36 in poster at 300 ppi is 7200 × 10800 px, or 78 megapixels. At 150 it is 19 MP. A 3 × 8 ft banner at 300 would be 311 MP; at 100 it is 35 MP and nobody standing in front of it can tell. A 12 MP phone file (4032 × 3024) tops out at 341 × 256 mm at 300 ppi, and covers 683 × 512 mm at 150.
The formula covers tonal detail, and hard edges behave differently. People spot a jagged diagonal or a banded sky well past the point where the numbers say they can’t. All the formula gives you is a ceiling on useful resolution.
Files can also be too big. Ghent Workgroup preflight sets a maximum of 450 ppi for colour and greyscale on commercial offset, and 300 ppi on newsprint. A customer sending 600 ppi gets a slow file out of it and no more sharpness. GWG’s floors (150 ppi commercial, 100 ppi newsprint) are reject thresholds, so don’t aim at them.
DPI, PPI, once
PPI describes the pixel grid of an image, and DPI describes the ink dots an output device puts down. The number in an image header is ppi metadata and changes no pixel data. Printers say “dpi” for file resolution and everyone understands them, so leave that alone. The one place the distinction earns its keep is that a device’s dpi and a file’s ppi aren’t comparable. A 2400 dpi platesetter does not want a 2400 ppi image.
When the file is short
Interpolation redistributes pixel values the file already has, and a machine-learning upscaler invents plausible values it never had. Neither one recovers information. Sharpening masks softness without restoring anything, so don’t expect to add detail where there is none in the original.
A working rule:
- Under about 1.5× short. Upsample, sharpen lightly and send it. Screening and dot gain will hide it.
- About 2× short. Judgement call, on content and viewing distance. A landscape will usually survive, a face or a logo won’t.
- 3× or more short. Re-source the image. What an upscaler invents on a product shot or on legal copy is a defect you now own.
Print Prepper takes a target DPI at the resize step rather than promising one, and runs Real-ESRGAN only on photographic jobs, only at a scale factor of 1.2 or more, and only on sources under about 2 megapixels. Everything else goes through Lanczos with an optional unsharp pass. It won’t turn a 3× shortfall into a printable file.
The line for your spec sheet
Stop writing “supply artwork at 300 dpi”. Write the pixel count:
Finished size 210 × 297 mm. Supply artwork at least 2551 × 3579 pixels, including 3 mm bleed on every edge.
Anyone can check that in ten seconds, and retagging a file won’t satisfy it. It settles the argument before the job reaches the floor. Colour is the other half of that conversation, and it goes here.